| SVG border file: | Use viewbox | |
| Custom border scale factor: | ||
| Columns: | cells | |
| Rows: | cells | |
| Seed: | ||
| Use non-deterministic randomness: | (seed is ignored if ticked) | |
| Grid size: | cells | |
| Initial Grid position noise (0 to 1): | ||
| Growth radius: | cells | |
| Curve fitting threshold (>0, decimal): | ||
| Straight line fitting threshold (>0, decimal): | ||
| Smooth choke points: | ||
| Corner pre-smooth: | ||
| "Pointy" piece growth: | ||
| Show traced vectors over preview | ||
| Magic number(just leave it at 6.2): | ||
| Growth probability (0 to 1): | ||
| Actual cell size: | mm | |
| Cell preview scale: | pixels/cell | |
| This jigsaw has: pieces | ||
| Jigsaw dimensions: mm | ||
| Growth step: |
How it works
Basic Initial setup
This jigsaw generator is based on a cellular automaton. A cellular automaton consists of simulated "cells" living in a grid, and their life cycle behavior is set by some usually simple rules. In this case, we simulate colonies of different types of cells, that get to live, eat other cells and get eaten, competing with other species in their "grid world" to be the most abundant. This is all governed by randomness, so every jigsaw generated is unique and can't be regenerated (well... this is not entirely true but let's not go down that rabbit hole). It all starts with a blank rectangular grid, where the cells will live. Each grid spot can only be occupied by one cell, like in this 27x27 world:
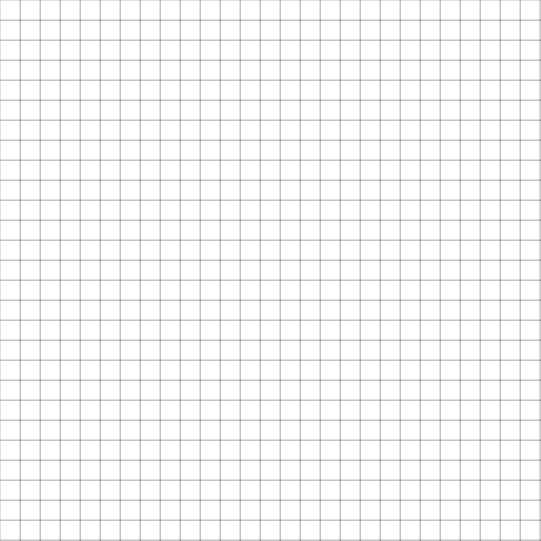
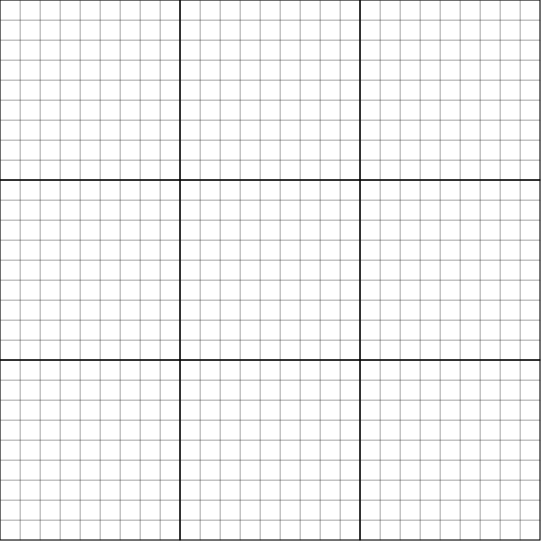
The grid world is subdivided into a subgrid of regions of Grid size by Grid size cells in size, like this example below, where the 27x27 cell world is subdivided into 9x9 cell square regions. When the division isn't even (in this case it is, as 9 evenly divides 27), the last row and column of this subgrid may be smaller or larger to compensate.
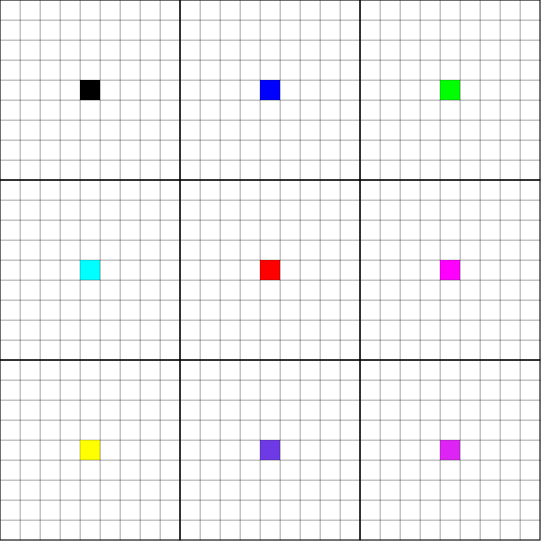
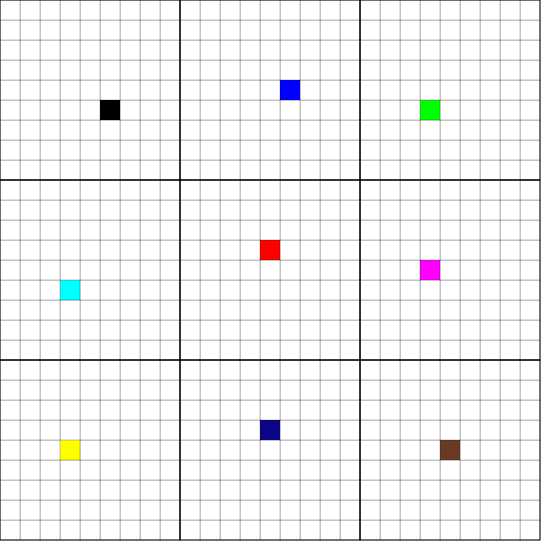
Now, when you press Generate Jigsaw seed cells are planted, exactly one per subgrid region. Each seed cell is a different species, represented by its color. All cell species behave in exactly the same way, distinguishing their own kind from the rest based on their color. Where the seed is planted within its region is controlled by the Initial Grid position noise parameter. This parameter can take any decimal value from 0 to 1 and means how much randomness is added to the placement of the seed. If you set this parameter to zero (left) the seeds will be planted in the center of their region (or a bit shifted if Grid size is even). Increasing Initial Grid position noise values enlarge the area around the regional center where the seed may be planted, up to the region borders when it approaches 1, as shown below:
|
|
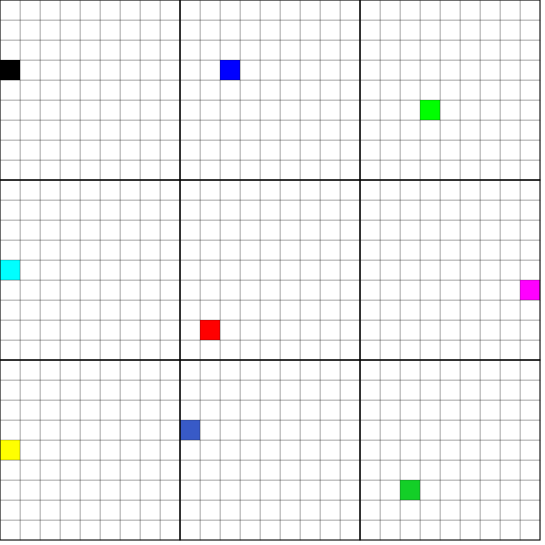
Please note that the seeding process is totally random, so it's possible (although unlikely) to get a perfectly even seed distribution with high values of Initial Grid position noise. In essence, more Initial Grid position noise means more irregular and uneven seeding patterns, which will lead to more irregular initial growth patterns.
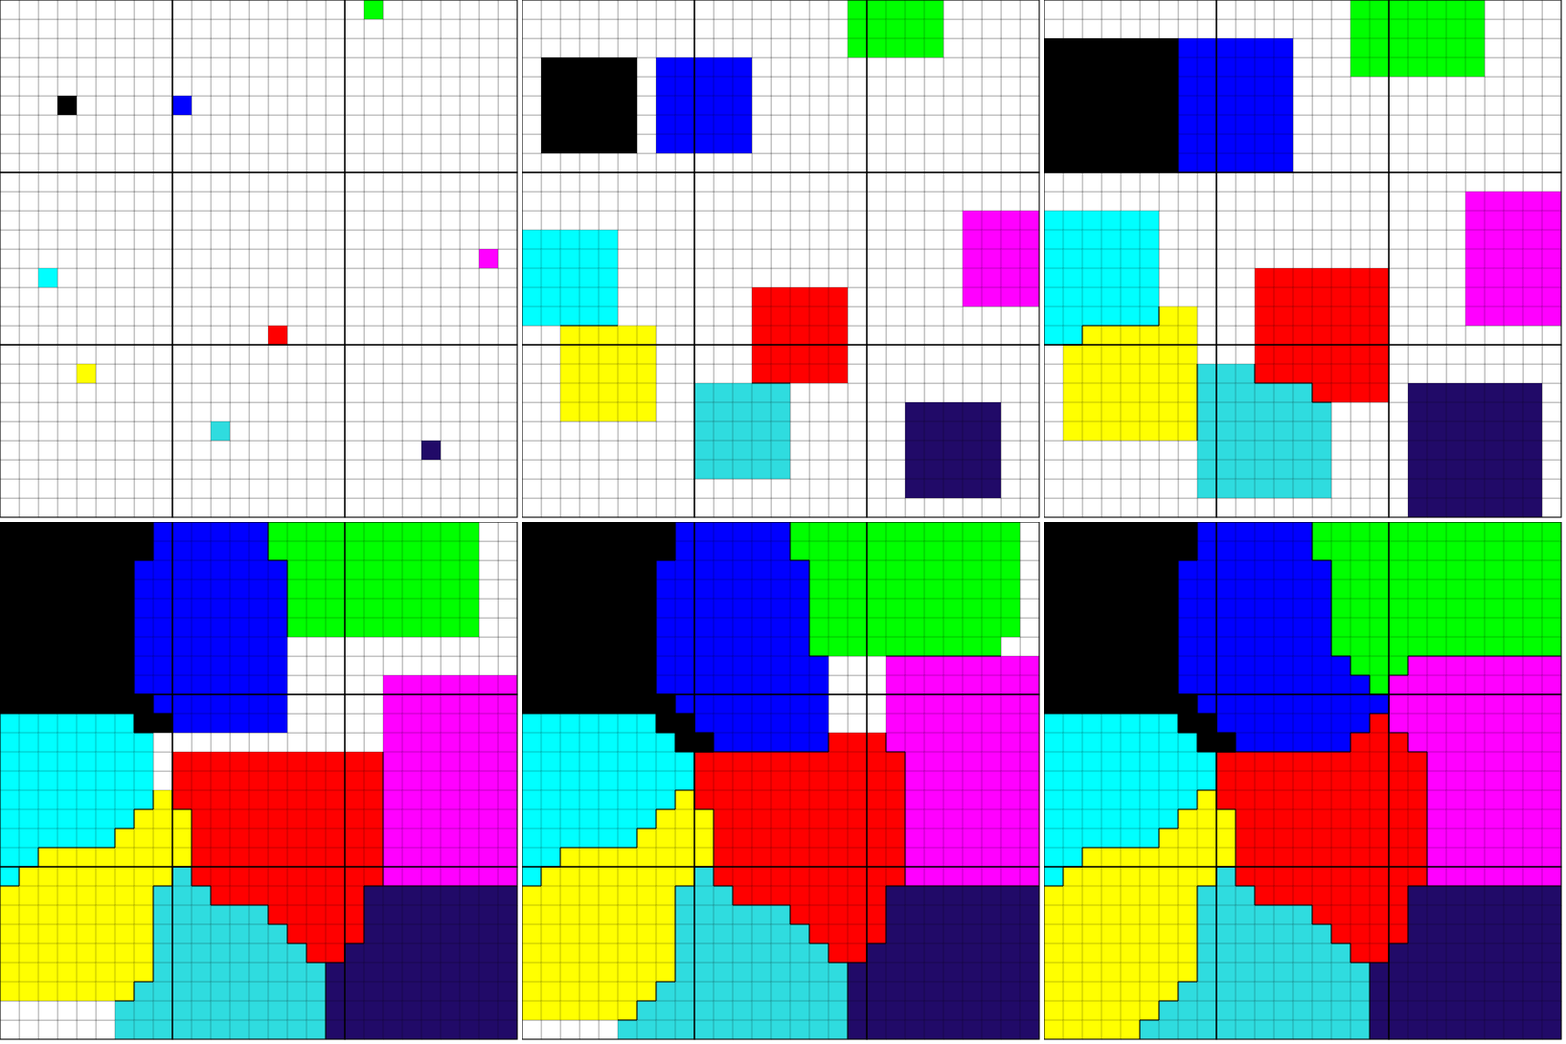
After the seeds have been planted, the cells start multiplying trying to conquer as much territory as possible. For now, their only goal is to fill their world leaving no space unconquered. Cells start multiplying and their spawn starts conquering the neighboring places, until the whole world is filled with cells. For now, cells don't eat each other, they just grow to form the initial growth pattern, unrestricted, until the world is full of cells, like this:
Jigsaw growth
Once the initial growth has been established, the cells may start eating each other forming the intricate, organic jigsaw puzzle patterns. Every time you press the Grow Jigsaw Manually button, or continuously as fast as your browser can go if you Start Automatic Growth, every cell in the border of its region is proposed for growth, with Growth probability. If Growth probability equals 0, no cell will ever grow, the world will remain stale in its initial state and no jigsaw puzzle patterns will emerge. Growth probability is set to 1, every single region-border cell will try to grow, eating neighboring cells and conquering their region. Anything in between essentially regulates growth speed.
Cells aren't guaranteed to grow, even if they are selected for growth, they will only be able to divide and conquer neighboring spots by eating the resident cell from other species in that spot. However, there are restrictions on which cells can be eaten. The idea behind the algorithm is to allow eating neighboring cells of a different species (color) as long as that doesn't split the attacked colony in two, i.e. that each and every cell of one color remains attached to at least one cross neighbor of the same color. In this case, corner neighbor attachments don't count as attachments.
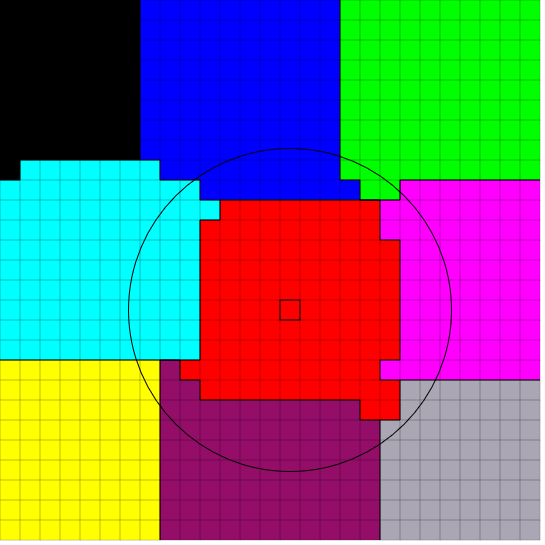
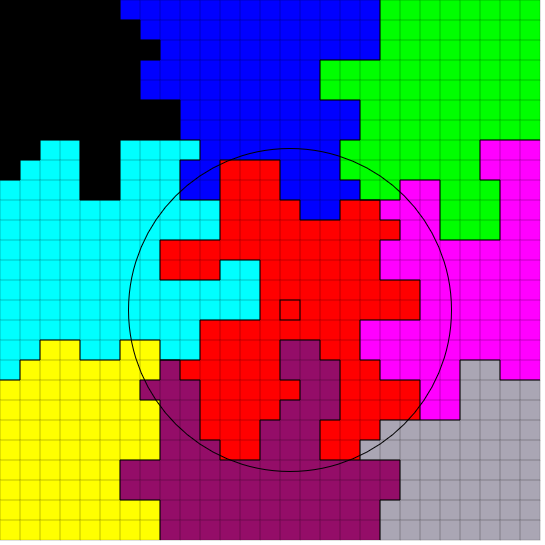
There's also another limitation, as cell colonies aren't allowed to grow farther than Growth radius units away from the initial seed position of the colony (they are initially allowed to conquer as much territory as they want, until the whole grid world is filled). This means that no places too far away from the initial seed point will be eaten by the colony, limiting the extent of its growth. This avoids growing too long and thin dendrites or tentacles, which make less robust, more fragile, and potentially too intricate jigsaw pieces. This parameter has to be changed depending on the selected Grid size. A larger Grid size requires a larger Growth radius, or else nothing will grow or the growth will be too limited, so the pieces won't form interlocking dendrites. The example below shows the effects of Growth radius. The initial seed position of the red colony is shown, along with a circle representing the maximum growth radius for this colony. Increasing the Growth radius enlarges the potential extent of the colony growth.
|
|
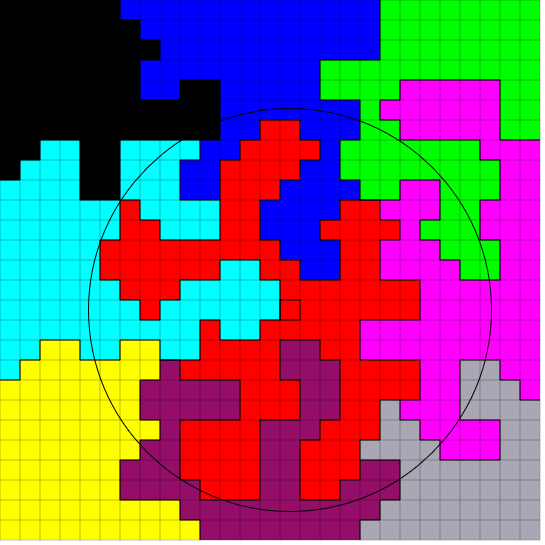
|
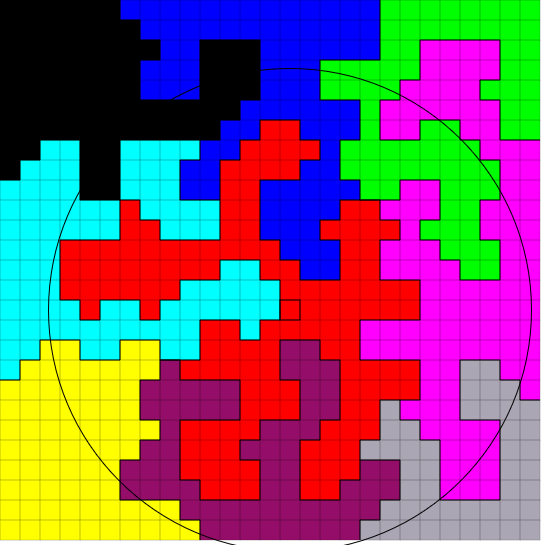
|
The growing algorithm behavior is governed by a parameter that acts as a magic number. For some reason, setting this parameter (Magic number) to around 6.2 makes everything work. Setting it to other values makes it not work. I left it there for you to play and see what happens if you dare to change its value.
Jigsaw vectorization
The jigsaw pieces are generated by tracing and vectorizing the borders of the cell colonies. The algorithm finds the borders between all regions and fits quadratic bezier curves and straight-line segments with configurable accuracy. As the cells are considered square, the border between regions is a jagged staircase pattern. The vectorizer tries to infer curves from the staircase patterns to smooth out the border and give the pieces their characteristic organic look. The "jaggedness" of the resulting vectorization can be controlled by the Curve fitting threshold value. Lower values of Curve fitting threshold yield more jagged results with more straight line segments, while higher values fit more curves. See the example below for the same growth pattern, vectorized with different Curve fitting threshold values. Please note that too high values of Curve fitting threshold are prone to create intersections or very narrow choke points, so I wouldn't recommend setting it much higher than 1. Also, the parameter acts kind of logarithmically. There's a much more noticeable change from 0.2 to 1 than there is from 1 to 10, or from 10 to 10 million.

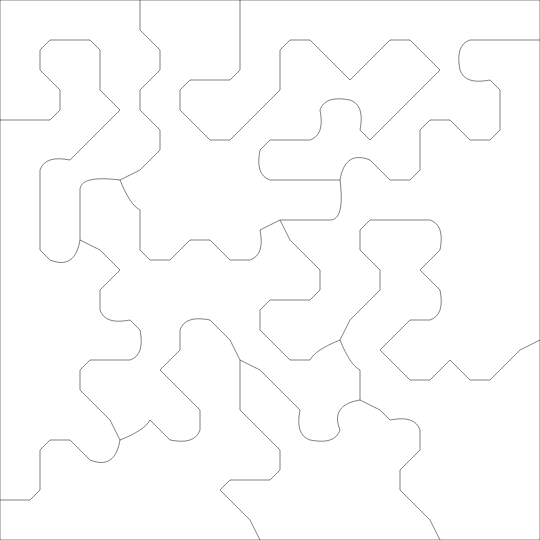
|
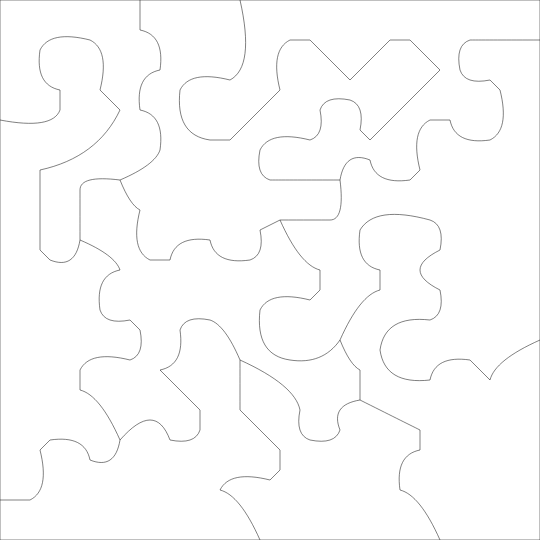
|
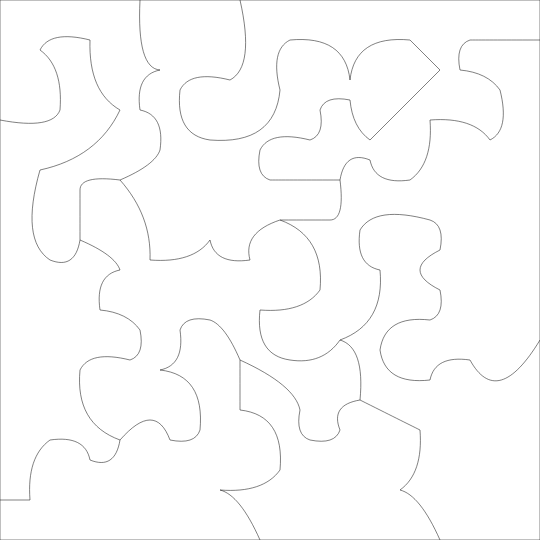
|
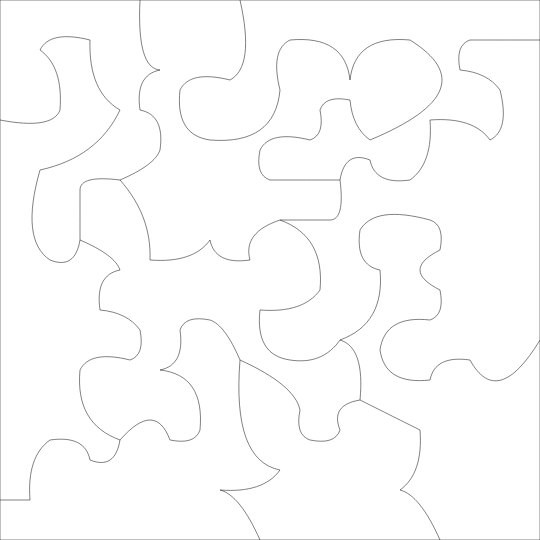
|
The fitted curves and straight lines are stored in SVG format, which is very convenient as it's a web-native vector file format, and compatible with most laser cutting software. It can also easily be converted to other vector formats such as DXF using free software.
Jigsaw style and dimensions
During the generation process, everything is stored internally in unitless dimensions with no connection to the physical world, and each cell occupies exactly 1 square unit of real state in the grid world. This means an N rows x M columns grid world will host N x M cells. You could, in a way, say that everything is measured in cell units. However, this has to be translated into the physical world somehow, both for cutting and for preview display. The SVG preview is given to the browser in unitless size, which is normally interpreted as pixels. This allows for the display of large jigsaws on normal screens. When you download the SVG, however, it will be set to millimeter units. A unitless internal 100 x 100 units SVG file will be downloaded as a 100mm x 100mm SVG, with a properly defined physical size for laser cutting. So please be aware that the size shown in the preview during generation is related to the final jigsaw size, but it's not the same. The on-screen size is NOT the jigsaw size. The actual jigsaw dimensions are given after generation. See the specific sections for rectangular and custom border modes for more details about jigsaw dimensions.
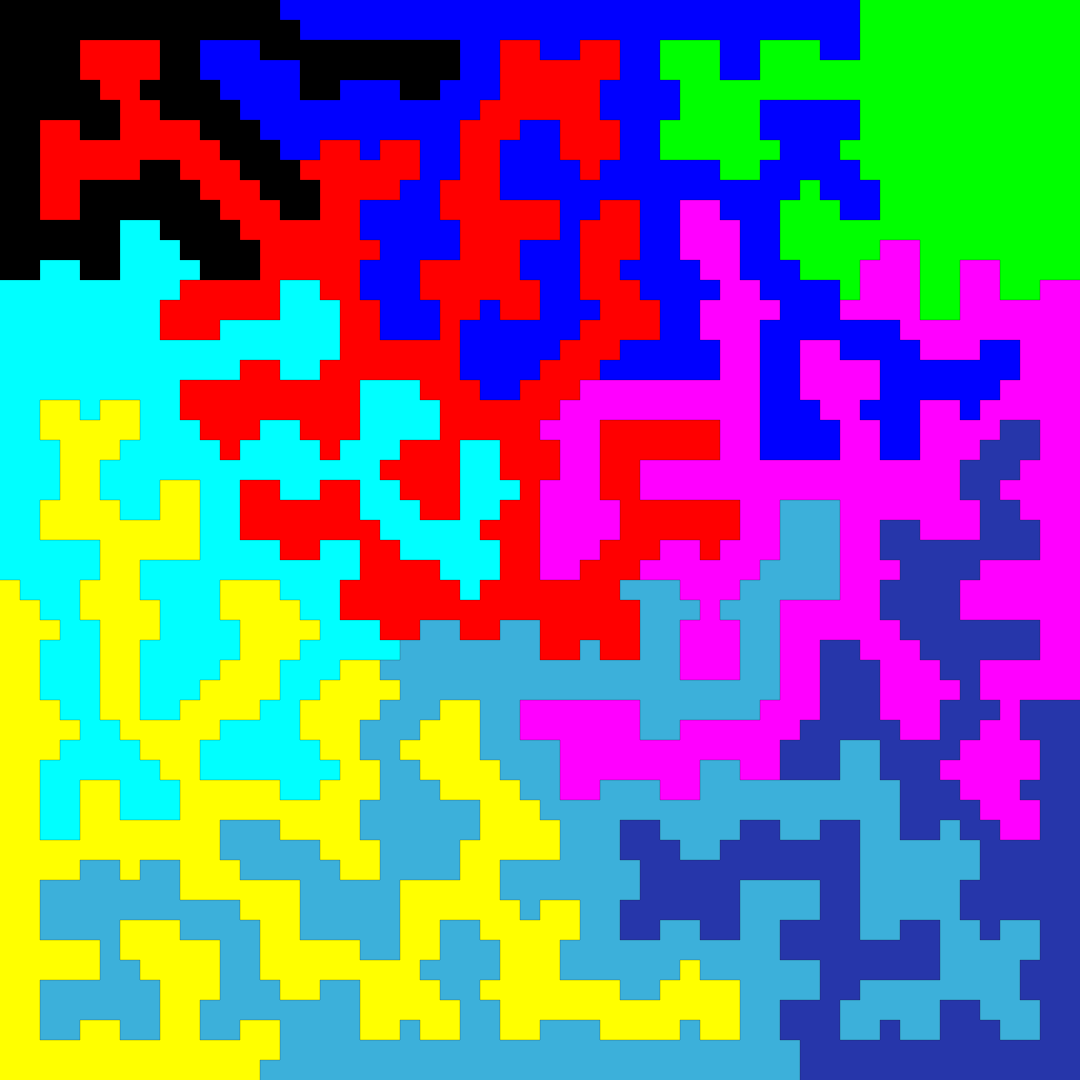
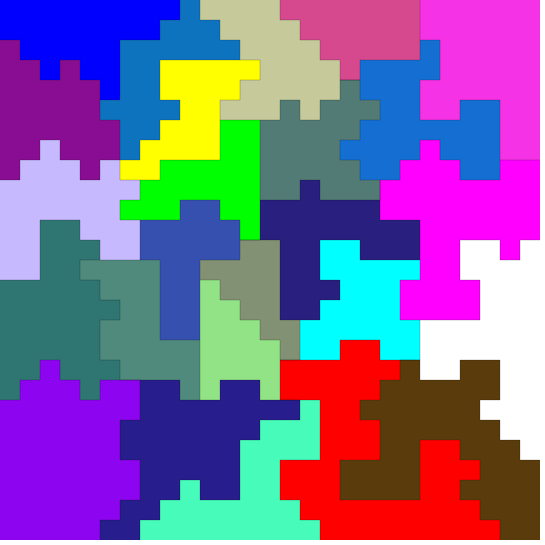
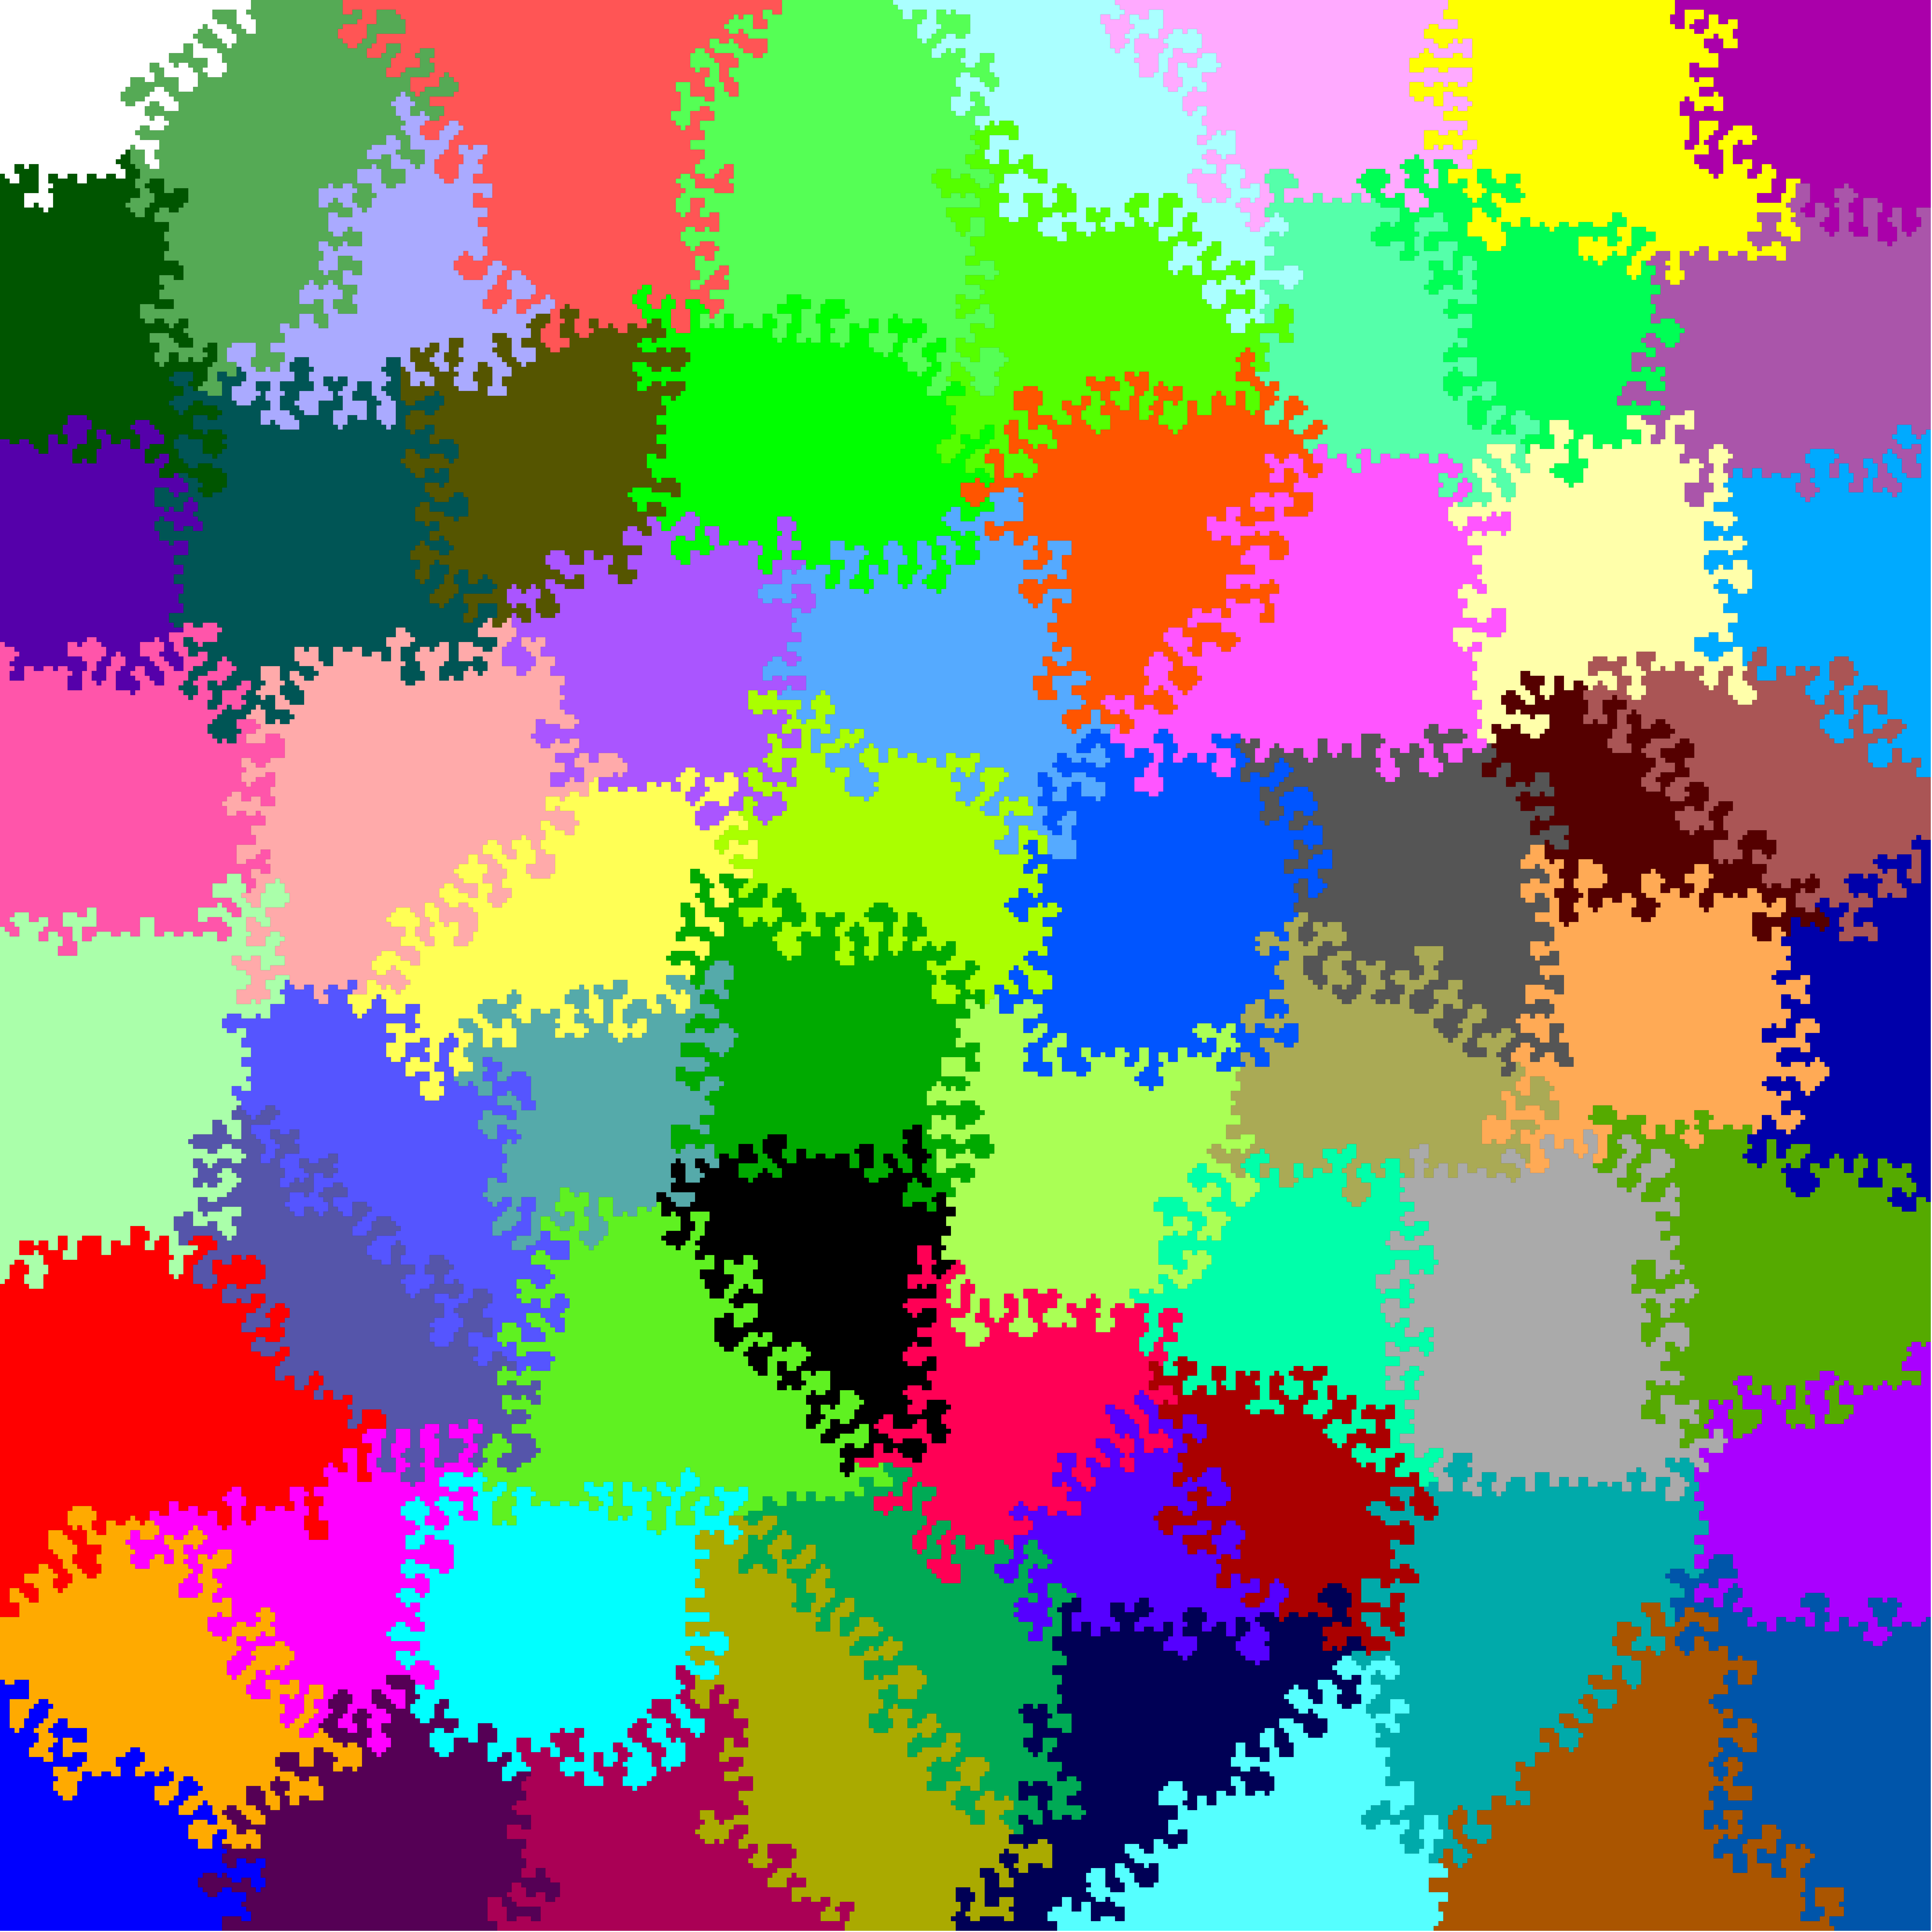
This generator creates multiple jigsaw styles depending on the Grid size parameter. As the growth algorithm is size-independent and in the end yields dendrites and tentacles about 1 to 3 cells wide, the relative size of the dendrites to the overall region, combined with the limited growth radius, helps create very different jigsaw styles. Grid size below 8 or so will create initial patterns that will most likely grow very little or not at all. Grid size about 10 is the sweet spot for starfish-like pieces, where the dendrites are comparable in size to the overall piece. Larger Grid size while keeping Growth radius not too large create more dendritic-cell like patterns. Large Grid size with a large Growth radius yields very intricate, coral-like pieces. Play with the parameters to see the different results, as you can see below.
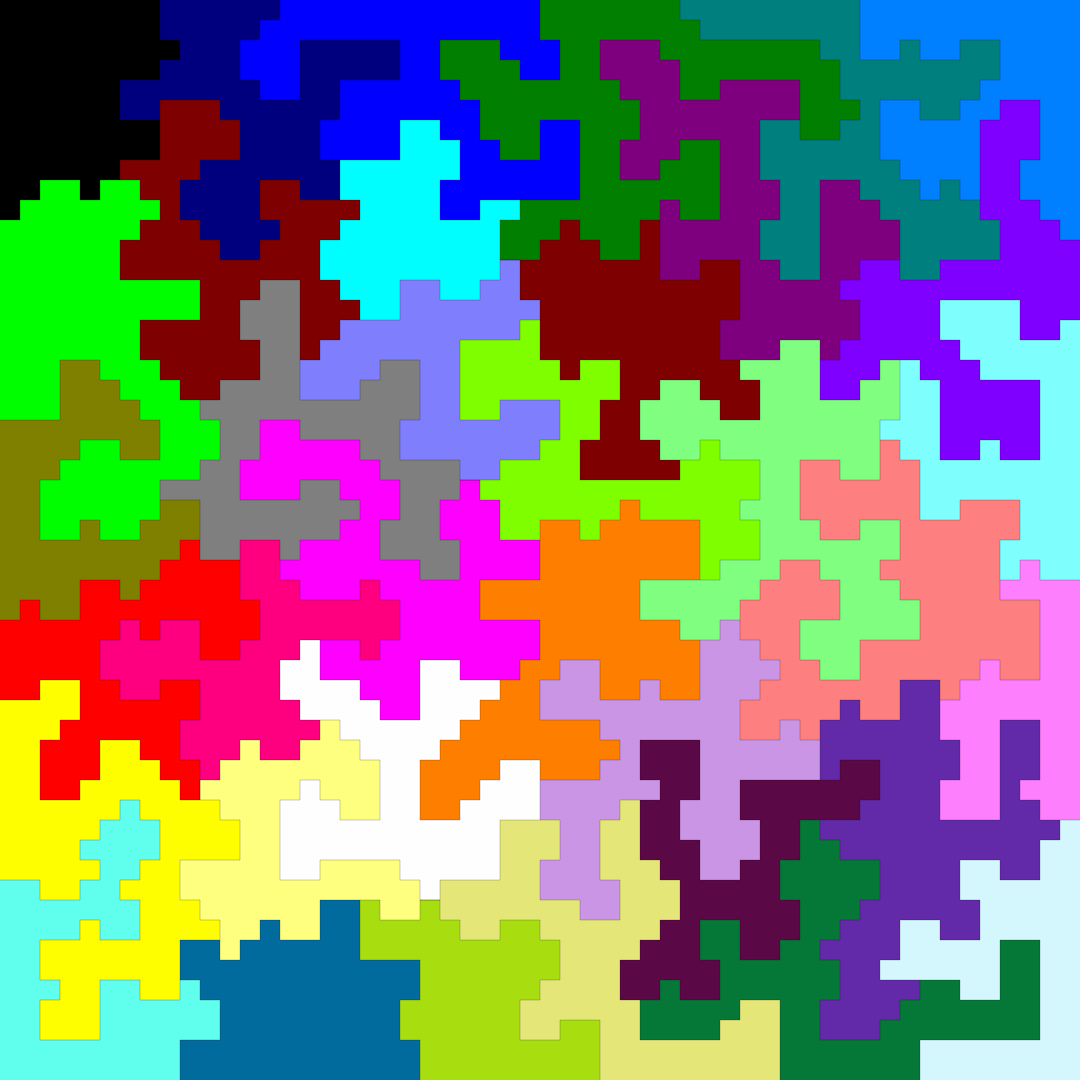
|
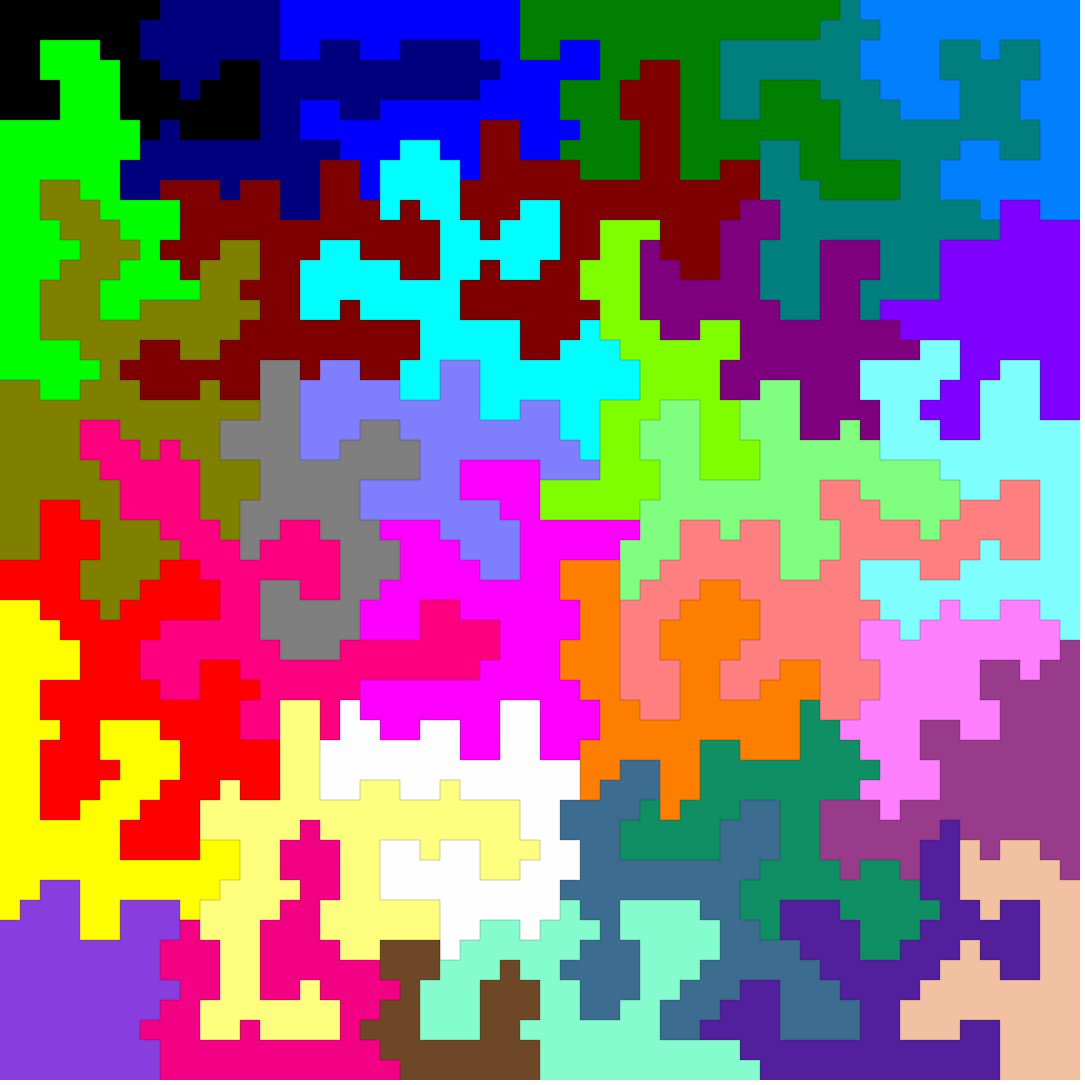
|
|
|
|
Please note that these jigsaws are meant to be laser-cut, and small structures may cause trouble. You have to scale things taking real-life material behavior into account, so that edge details between pieces have a large enough size for cutting properly.
Rectangular border mode usage
This is the easiest mode to use, and it will generate rectangular border jigsaws. In this mode, you can manipulate several parameters. Most of them have already been explained in detail in the previous sections:
- Columns and Rows: set the dimensions, in cells, of the grid world where the cells live.
- Grid size: this is the subgrid size used for initial cell seeding. Read the previous sections for more details.
- Initial Grid position noise: this parameter affects the irregularity of the initial growth pattern, as explained in the previous sections.
- Growth radius: how far away from the initial seed spot can a colony grow, as explained in the previous sections.
- Curve fitting threshold: regulates the tendency of the vectorizer to use straight lines vs curves to fit the cell colony borders, as previously explained.
- Magic number: just leave this at 6.2 ok?
- Actual cell size: this translates cell units to actual millimeters for SVG download, and to pixels for preview. See below for details.
- Cell preview scale: this translates cell units to pixels for the colored, grid world preview. Each cell will be represented by a Cell preview scale x Cell preview scale pixels square. Has no effect on the actual vectorized jigsaw, this is just for visualization.
To use the generator in this mode, simply select your parameters and press Generate Jigsaw. The initial growth pattern will be generated. Then you may start growing the jigsaw, either manually by repeatedly pressing Grow Jigsaw Manually for step-by-step growth, or by pressing Start Automatic Growth and letting the computer automatically do the step-by-step growth as fast as it can. Once you're satisfied, Stop Automatic Growth if it was enabled, and download your results in SVG, ready to laser cut. If you don't like what you see, simply re-adjust the parameters if you want and press Generate Jigsaw to start from scratch, or just change any parameter (except Columns, Rows, Grid size, and Initial grid position noise) and keep growing from there. If you press Generate Jigsaw to start from scratch, everything you had is lost forever. There's no way to save anything, except for the SVG output.
The generator will tell you the jigsaw dimensions and total piece count. The dimensions, in millimeters, are calculated as follows:
- Width = Columns x Actual cell size mm.
- Height = Rows x Actual cell size mm.
Being vector graphics, you can of course scale this as you want. It is recommended to keep Actual cell size above 2 or 3 mm, to get stable pieces without choke points or too thin sections that may break easily. For plastics or non-fibrous brittle stuff, definitely keep it above 3 mm. If you want a 200x200mm jigsaw for cutting in plywood, you could, for example, set Columns and Rows to 100 and Actual cell size to 2 mm, or set Columns and Rows to 50 and Actual cell size to 4 mm.
Custom border mode usage
In this mode, the generator will use a custom border for the jigsaw, given by a border SVG file. When you set this mode, it will prompt you to select a custom SVG border file. The SVG border file must be an SVG file defining the intended border you want to use. It must contain at least one area enclosed by strokes, and it may have holes inside. The SVG border file will be preprocessed before generating the jigsaw. First, your SVG file will be flattened. That means that all the SVG transforms will be applied and burned in, and all the stroke and fill settings will be removed. Every element (basic shapes, paths) will be stripped of fill and stroke style attributes and set to no fill and a basic black stroke. The contents of the files will be moved to the upper left corner and the extent of the drawing will be set to exactly contain all the elements, like this:
|
|
|
|
|
Also, your SVG file will be stripped of dimension units information (set to unitless) and interpreted as if its dimensions were millimeters. Finally, it will be scaled up or down by the Custom border scale factor.
After the border is preprocessed, a grid world will be created based on the border size, interpreted as millimeters, and the Actual cell size parameter. For example, if the normalized border's extent is 200 by 100 units, it will be interpreted as 200 x 100 mm. If the Actual cell size is 1 mm, a rectangular grid world of 200 by 100 cells will be created. If Actual cell size were 2mm, a 100 by 50 cell world would be created instead. Then, the border will be rastered on top of the grid world. Every grid position where the border passes through will be flagged as a border cell.
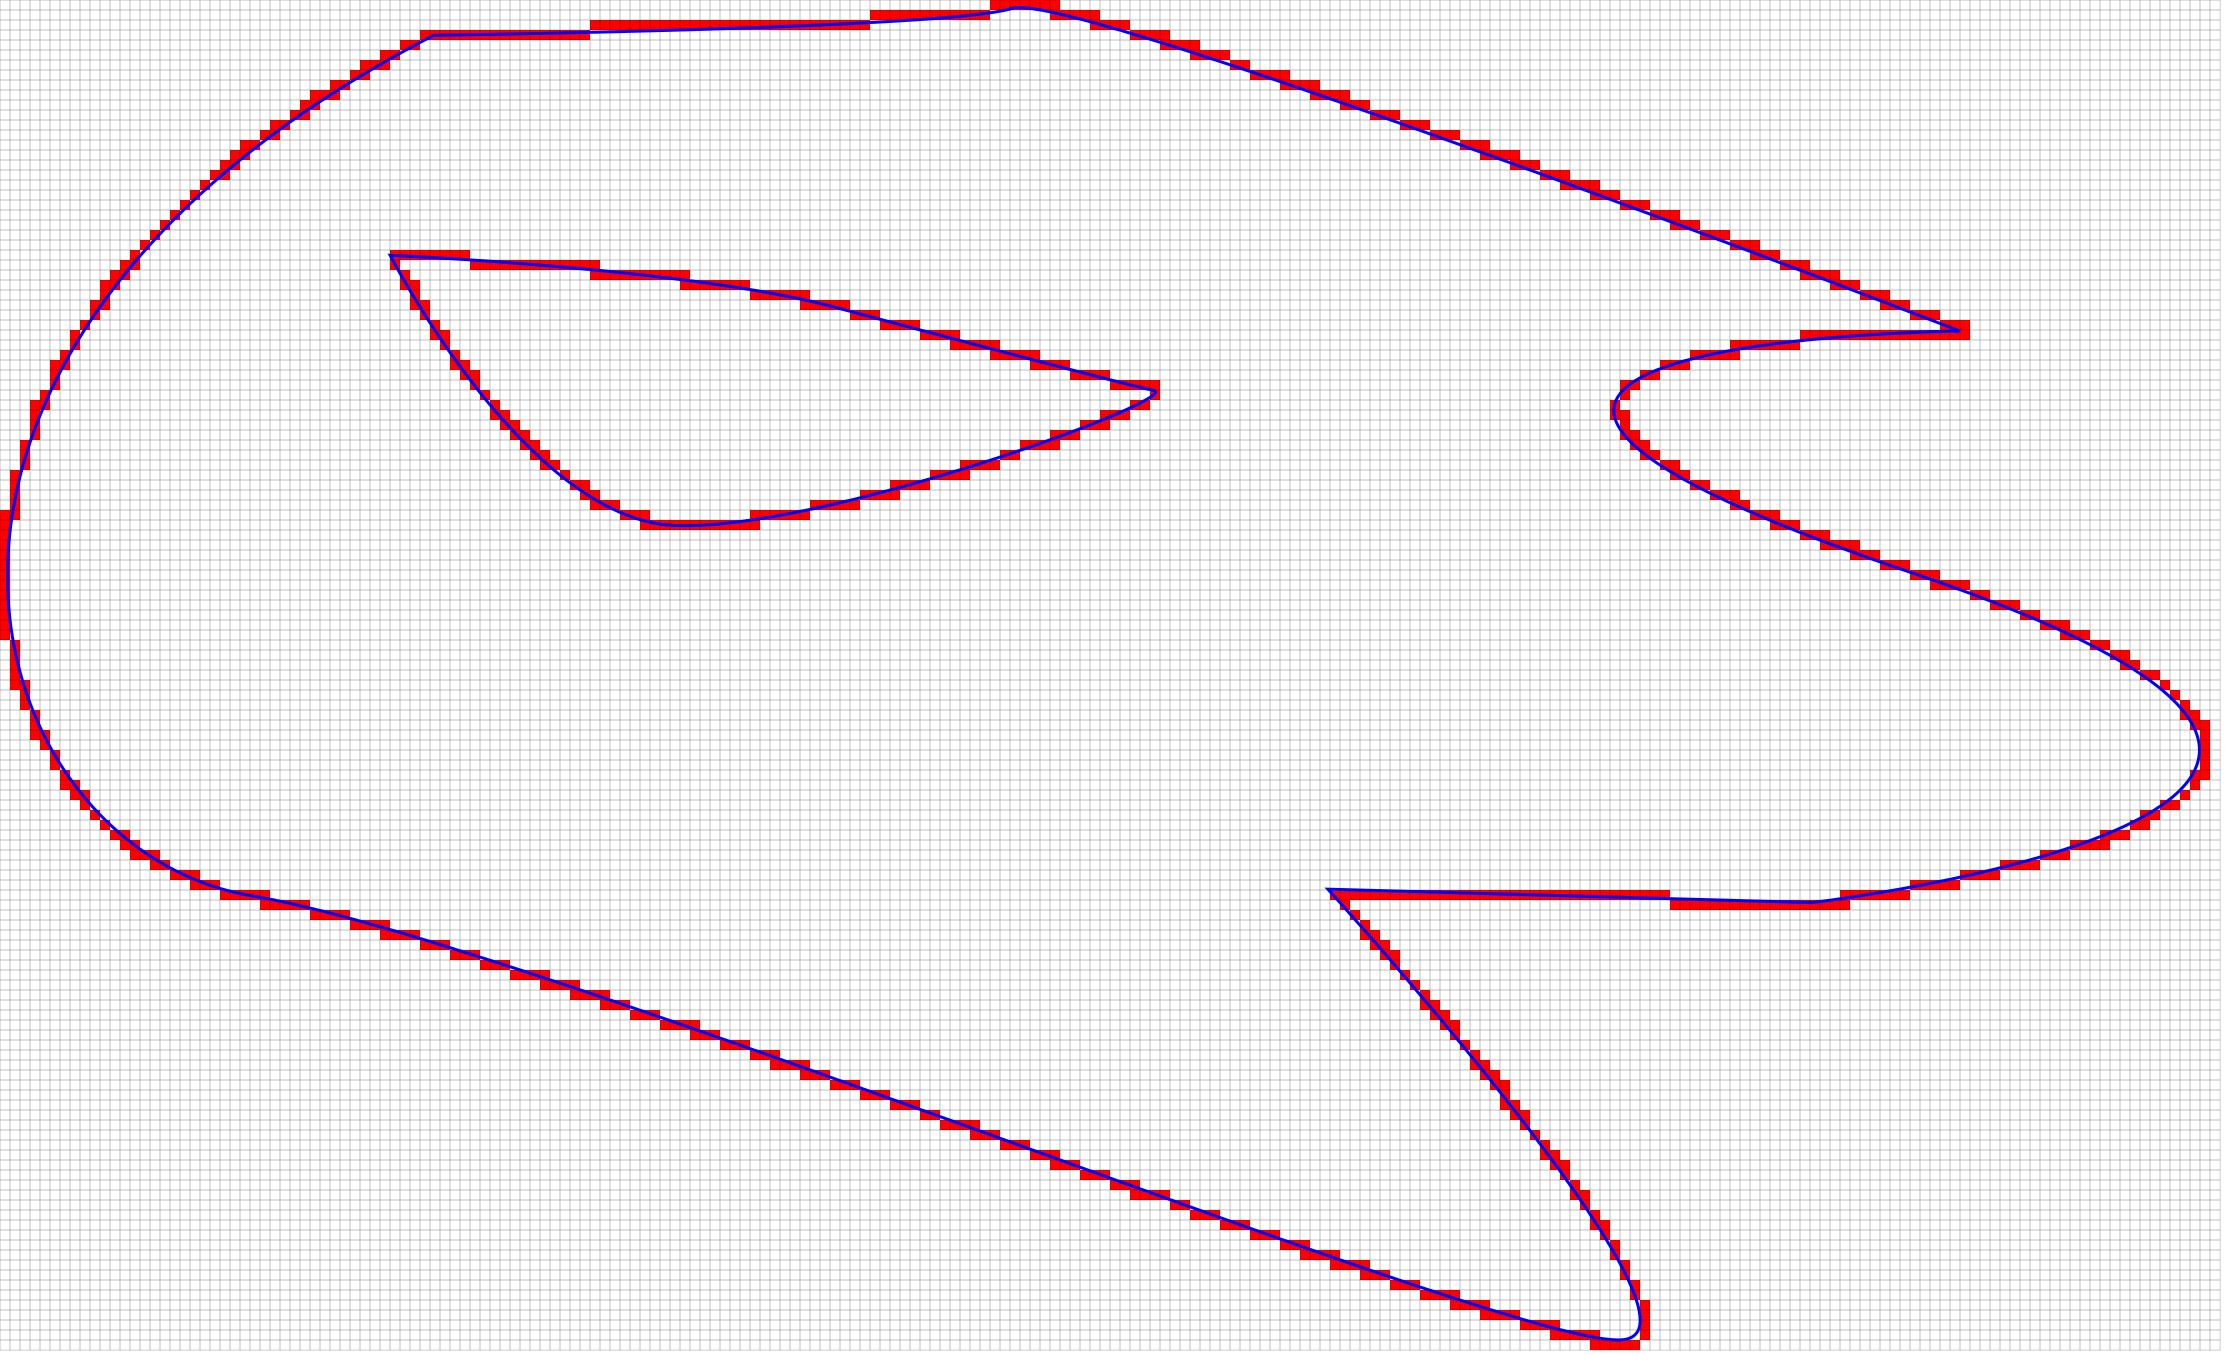
Once the cell borders are established, a flood-fill algorithm is executed to try to distinguish inside from outside, and generate the final growth mask for the custom border, like this:

After the mask is generated, the grid world is seeded (only seeds falling in unmasked areas are allowed to grow) and the growth proceeds normally from there, within the unmasked areas.
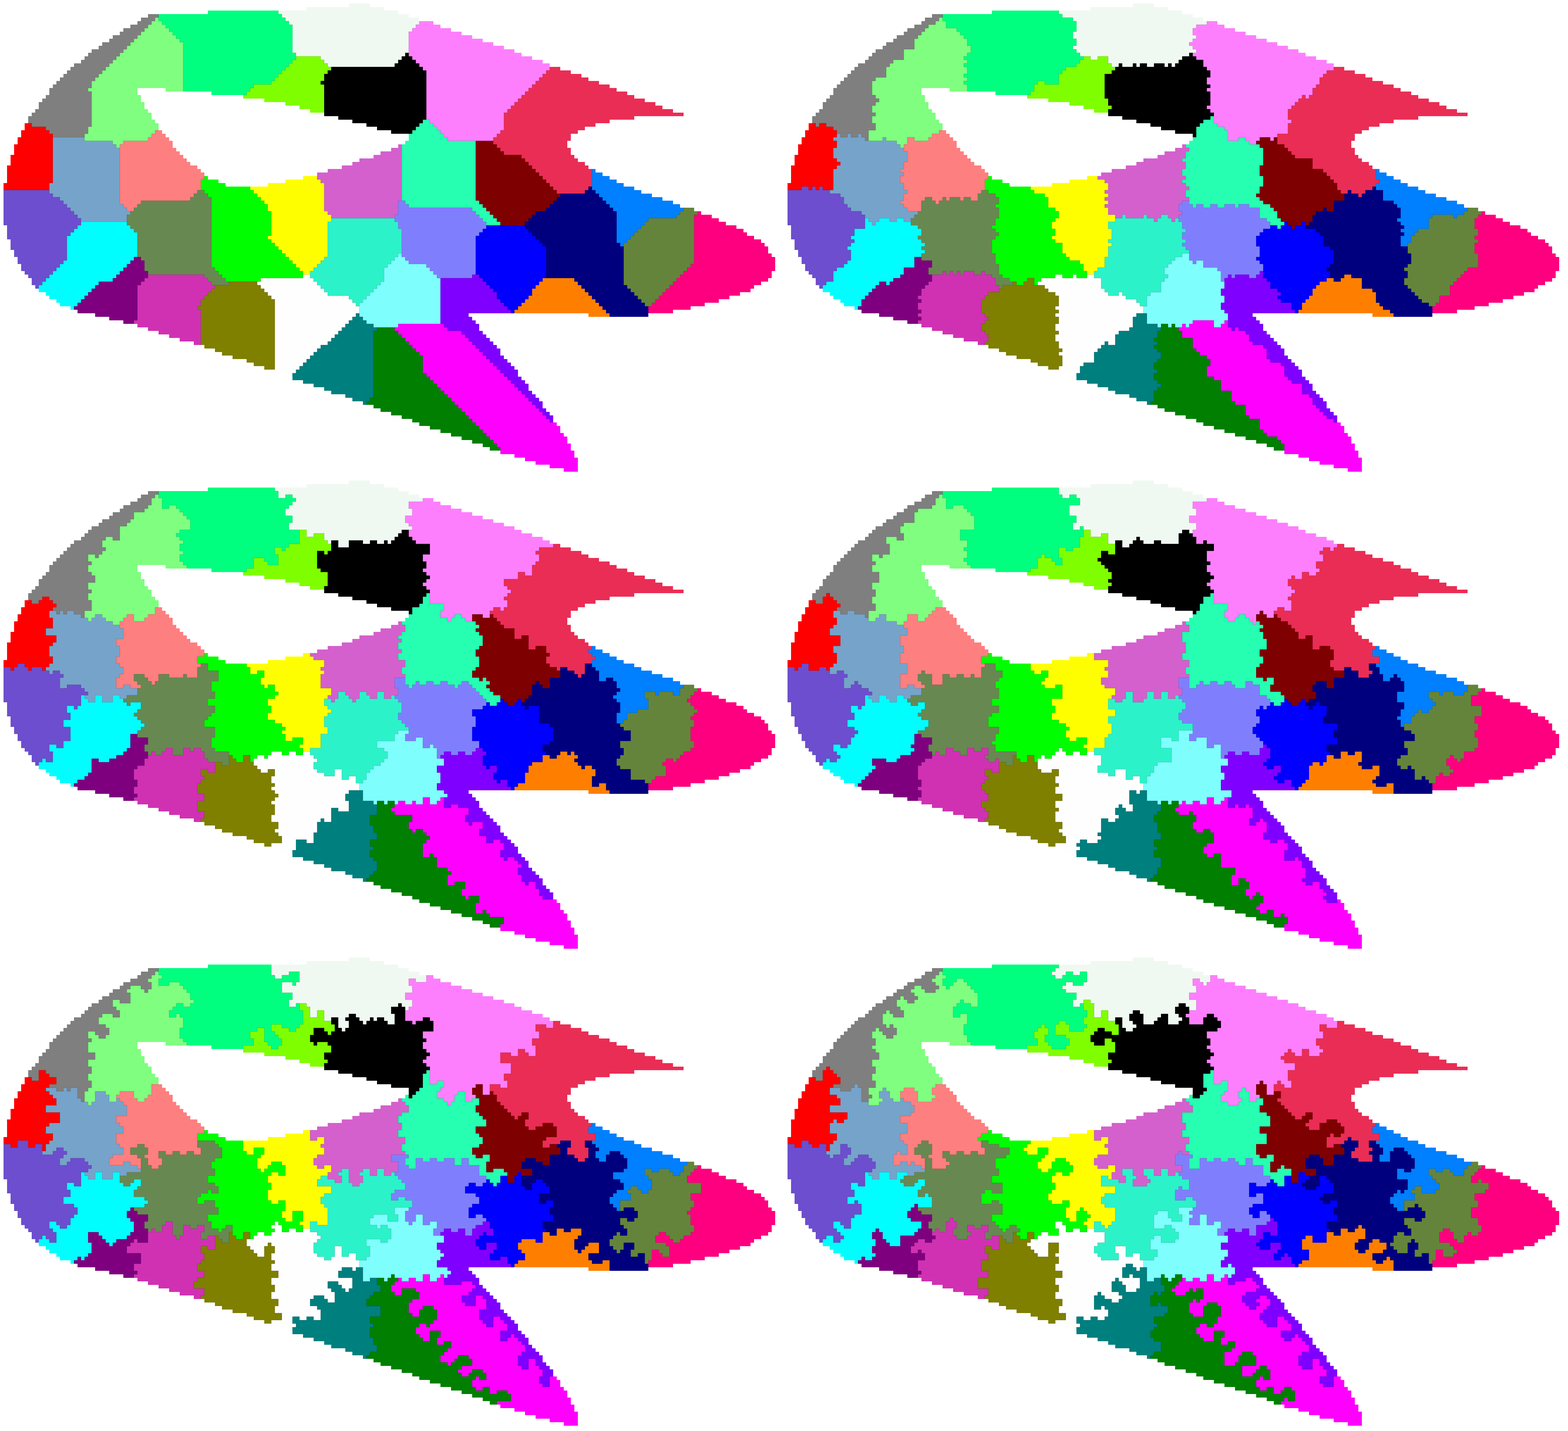
Hopefully, after this explanation of how things work, you should have grasped an intuition on what kind of border files will work and not work. You may use Inkscape or any other vector graphics editor to check your border beforehand. Select every element of the border file, remove fill and set the stroke to a simple black line. If you see something with clearly defined inside and outside areas, with no intersecting contours, then it should work well. Anything else should be simplified before. As you may have already guessed, whimsical pieces drawn inside of the border will work just fine (unless they're too intricate...). In fact, the inside part of the example border could be considered a whimsical piece.
The vectorizing process works exactly the same in this mode as it does in rectangular mode, but the custom border is also drawn. There's a quirk, though. As the cells live in a discrete, grid world, the region borders will start and end at cell boundaries, and not necessarily exactly over the custom border. If you don't do anything else, this is the result of the vectorization process for a custom border jigsaw:
You may have to zoom in to notice, but you will see that the pieces near the border aren't fully cut, as the ends of their borders don't land exactly on the custom border. To fix this, the generator snaps these ends to the border, so that they land exactly on it and the pieces are fully cut.
As a final note, if you want to cut over a print and you have traced out the outline of your image and want to preserve it as-is with no scaling, you should set the SVG units to mm, the extent to exactly surround the border and the Custom border scale factor to 1. Then, the exported jigsaw will have the exact same dimensions as the border and will be left untouched (except for the style normalization).
The settings work essentially in the same way as they do for rectangular border mode. Rows and Columns can no longer be adjusted, as these are calculated based on the border dimensions as explained above. The meaning of Actual cell size also changes, as explained above. Also, there's a file picker button in case you want to switch the custom border to a different one.
FAQ
Where are my border files uploaded?
Nowhere. It all stays on your computer, the border file is just loaded into your browser and used exclusively within the browser. You're basically downloading a self-contained webapp and executing it locally, in fact you can download this for totally offline use, see below.
Is this free?
Yes, it is. The code falls under the MIT license
Where can I get the code?
Can I use it offline somehow?
Sure, this is all executed in your browser. Just clone the github repo or right-click save the web from your browser. It will download all the required assets, and you may run it by just opening index.html using your favorite browser.
Which browsers are supported?
As far as I know, any modern browser should work. It's been tested on the most up to date versions (April 2022) of Firefox, Chrome, Edge, and Safari.
Is this all your job?
No, I use two third-party libraries.
- A heavily modified and stripped down version of imagetracerjs 1.2.6 for vectorization.
- Flatten.js for SVG transform flattening.
Any known issues?
Many. This should be considered beta software, use with caution. I recommend cutting in cheap material before committing for a design, to see any potential issues before wasting expensive material. I'm not responsible for any material waste. Here's a list of known issues:
- Sometimes the vectorizer creates micro-loops at border pieces in custom border mode.
- There's a very rare case that's not well handled by the vectorizer, making it miss a line and leaving one piece open. It's extremely rare, but it's in the pipeline for fixing.
- I really don't know how or why the growth algorithm works. I came into it by accident, while trying different approaches, and I'm not really sure why setting a parameter to 6.2 makes things work.
Do you have any other jigsaw generators for different jigsaw styles?
Sure, go suit yourself
I meant normal puzzles, with rectangular pieces with tabs
Then unfortunately no, but draradech has a very good one, and it's also free.
How can I contact you?
Use whatever tools github provides here to report bugs or whatever you find.